Wednesday, June 26, 2019

Sunset Background - Pan Pastel

Hello.  Thank you for visiting my Blog.  
You can also find me on Instagram at: Shultz551 

Blue Knight Rubber Stamp Design Team

Hello!  Thank you for stopping by my blog. I've had the pleasure of being a guest designer for Blue Knight Rubber Stamps during the month of June 2019. During my time with the design team, I have created several projects with the Lighthouse on the Beach Stamp Set. Each project was unique and I think the process helps to illustrate how one stamp set can be used in so many different ways! 

I was glad when I received the Lighthouse on the Beach Stamp to use as Guest Designer because out of all of the beautiful stamp sets that are available through BKRS, the Lighthouse on the Beach set reminds me of what I love about card making and mixed media.  It offers me HOPE. The creative process is a hopeful process because I use my mind, heart and soul to think of the new possibilities. A blank white page is a mini canvas for artistic expression. Similarly in life we have hope for tomorrow!  Even when we have the same set of tools and our resources have remained the same, we can have hope that there is the possibility of a new creation and a fresh start. Tomorrow gives us the chance to start all over again.

The background of this card was created using Pan Pastels, artist grade pastels in a pan format instead of a pencil or crayon. They are ultra smooth and similar to pressed powder (makeup) but an even smoother, silkier consistency.  Pan Pastels are highly pigmented and easily blend-able. Using special sponge tools created especially for Pan Pastels, I used short strokes instead of longer strokes and or circular patterns. These short strokes create the appearance of texture. I was trying to represent a sunset over the beach on a hot summer day.   The colors that I used for the sky were: Magenta, Diarylide Yellow, Orange and Permanent Red.  


The sentiment is from Blue Knight Rubber Stamps "Bible Verses 1" and is from Isaiah 40:31.  I stamped the sentiment over the sun. The eagle is from Blue Knight Rubber Stamps. 

You can purchase the Lighthouse on the Beach Stamp, as well as many other beautiful scenery stamps from BKRS at:  https://blueknightrubberstamps.com/lighthouse-on-the-beach/

You can find more of my cards on My Instagram: Shultz551

Thanks Again for Visiting!


Saturday, June 22, 2019

Deco Fun Ribbon - Large Gift Tags

Hello! Thank you for visiting my Blog. I am highlighting a Blue Knight Rubber Stamp Design Team project that I created as the June 2019 Guest Design Team Member. It is an honor to be part of the incredibly talented team at BKRS and I am thankful for the opportunity. 

Today I have created two jumbo tags using various mixed media including dot printed ribbon from DecoFun Bow Maker and The Ribbon Place.  If you would like to watch my You Tube Video tutorial that shows you step by step how I made one of these tag, here is the link to my You Tube Channel: 

https://www.youtube.com/watch?v=_-nOJ1f7vxE&t=468s


To make my tags, I used large tags from Brutus Monroe.  I sprayed the tags with Brutus Monroe Surface Sprays in a variety of colors.  I stamped the Lighthouse on the Beach by BKRS. I focused only the Lighthouse and used an oval die to cut this area out. This created a spot light on the Lighthouse. I stamped the Lighthouse using Versafine Clair Ink in the color Twilight, a deep navy blue color. I sprayed a 4.25" x 3.5"card the panel with surface spray.  I embossed the panel using a Brutus Monroe stencil and and alabaster embossing powder. The white embossed waves really stand out! Then I used three different DecoFun ribbons: the brown with blue dots, the blue dotted ribbon and the gold ribbon for the top of the tag. I used the sentiment "Happy Birthday....Sing, Dance, Eat, Play & Repeat" from BKRS and placed the sentiment at the bottom of the tag. The first tag is pictured above.


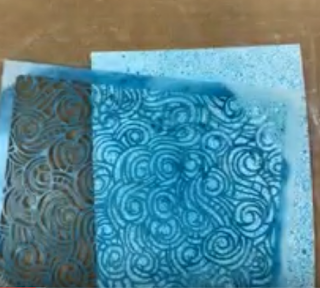
The second tag features the same format, but instead of heat embossing the wave, I used a sponge applicator to apply Versafine Clair Twilight Ink on the stencil. It really looks nice and makes the panel stand out. I used the same Happy Birthday sentiment. This tag was originally white with a smooth coating, which created a glossy effect, as opposed the tag above, which is plain paper and has a mat finish. 


Here's a photo of both tags side by side. Please leave me a comment 
below on which one is your favorite:

Here's a close up of the beautiful ribbon from DecoFun:

Here's a link to the DecoFun Etsy Store called "The Ribbon Place" https://www.etsy.com/shop/TheRibbonPlace

 You can purchase the Lighthouse on the Beach Stamp, as well as many other beautiful scenery stamps from BKRS at:  https://blueknightrubberstamps.com/lighthouse-on-the-beach/

You can find more of my cards on Instagram

My Instagram is: Shultz551

Thanks Again for Visiting!

Friday, June 14, 2019

Vivid Watercolor Card

Hello.  Thank you for stopping by my blog today! This my second card as a Guest Designer for Blue Knight Rubber Stamps! Hope you will read the information below to learn how I made this stunning card. Thanks again!


When Blue Knight Rubber Stamps honored me by selecting me to be a Guest Designer, they mailed me this stamp to be used for my projects:
Blue Knight Rubber Stamp "Lighthouse on the Beach"


The following is a list of the steps I took to create this card. I also made a short video and posted it to my You Tube Channel and called "Vivid Watercolor Card" here:   https://www.youtube.com/c/TracyShultz


  1. I trimmed a piece of Brutus Monroe Aqua Pigment watercolor paper to 4.25 by 5.5 I taped the paper down onto my cutting board with painting tape. I then heavily spritzed the panel with water until is was saturated.


2. I used Brutus Monroe Aqua pigment Water colors - making drops on the paper. In an effort to get the water colors moving, I used a piece of plastic wrap on top of the panel to create an interesting watercolor background. The colors I used were all metallic watercolors. 


3. I added more drops in areas where I thought I needed a deeper hue blue or pink. I repeated the plastic wrap smooch technique several times, and I added water to the panel where needed to get the water colors moving. 

4. I used my heat gun to dry to panel. I used black Archival ink to stamp the lighthouse and the beach scene. The Blue Knight Rubber Stamps magnetic ink pad handle helps keep my fingers clean as I stamped. I then stamped the sentiment, which comes from Isaiah 40:31.  In addition to the sentiment, the folks at BKRS sent me an eagle to go along with the Bible Verse. 


5.  I  trimmed the panel to remove the borders where the blue painting tape was used to hold the water color paper down on the cutting board. 

6. To clean my stamps I used Brutus Monroe Squeaky Clean stamp cleaner. 


7. I used the Crop A Dial to round the corners of both the water color panel and the pink paper I used to mat the panel.


 8. I adhered the panel and pink mat to a black A2 card base.


Here's a close up of the Lighthouse Tower, stamped with Ranger Archival Ink:


Here's a close up of the Bible verse and eagle stamps:

A final photo of the finished Vivid Watercolor card:


Thank you for stopping by my blog. I hope you enjoyed this card. Don't forget to check my You Tube video:


and other social media posts (Instagram: Shultz551; Facebook: Fans of Blue Knight Rubber Stamps) featuring this card.


Tracy


Saturday, June 8, 2019

Blue Knight Rubber Stamps Design Team Guest

Hello.  Thank you for visiting my Blog.  
You can also find me on Instagram at: Shultz551 

Blue Knight Rubber Stamp Design Team

Recently, I applied to be a design team member for Blue Knight Rubber Stamps. I applied to be on the design team because I love their stamps and I have created several cards with them. I was selected to be a GUEST designer for one month - June 2019.  I am extremely grateful for this opportunity and honored to be selected!
Blue Knight Rubber Stamps
Lighthouse on the Beach Stamp by Blue Knight Rubber Stamps


Here is a picture of the laminated card that comes with the cling stamp. The stamp clings to the laminated card and offers a convenient way to store the stamp. 


If you would like to watch a card making tutorial on how I made this card, please check out my You Tube video:

https://youtu.be/k7UgPEZaFDM

To create this card, I started by stamping the image on 130 lb white card stock by Brutus Monroe using Ranger Archival Ink. Then I masked the stamped image using masking paper.  This masked image shows you what the stamp looks like before I colored it. 


Lighthouse on the Beach by Blue Knight Rubber Stamps


Here's how I created the card:
1. After masking the card, I used cosmetic blending brushes that I purchased from Amazon to ink blended with these colors of Distress Oxide Inks:
  • Tumbled Glass (top/sky area)
  • Fossilized Amber (middle/sky area)
  • Wild Honey
  • Worn Lipstick (bottom/horizon)

2. I removed the mask and colored in the sun with Squeezed Lemonade. 
3. Using alcohol markers, I colored in the water, rocks, sand and lighthouse. 
4. Using a MISTI I stamped the sentiment "Good Morning Sunshine" from the Blue Knight Rubber Stamp "Good Morning Rooster" stamp set:
5. I used white pigment ink and a small cosmetic blending brush to make the clouds above the sentiment.
8. I used Wink of Stella in clear to add some sparkle to the sand.
9. I mounted the panel on a piece of black card stock.  

I look forward to designing more projects with this stamp in the upcoming weeks. Thank you for visiting my blog.  Don't forget to check out Blue Knight Rubber Stamps to see all the wonderful stamps they have to offer. 


Here's a photo of the final card:

Saturday, June 1, 2019

Graduation Card

Hello and thank you for stopping by my blog.

I made a card recently for a young man about to graduate from High School. The background stamp is from Unity Stamps and Brutus Monroe and is called "Hit the Brick."  I used Brutus Monroe "Wagon" ink on the stamp and stamped it twice using my MISTI.

Then I stamped the young man in the graduation cap and gown using the Unity Stamp "You Did Good" Stamp set.  I colored the young man with a variety of alcohol markers including: Copic Sketch and Nuvo.  


The graduate's school colors are red and black, so I used my Copic Alcohol Marker #R46: Strong Red.  I used a dark gray to color the cap and gown and since his hair color is black I used black for his hair. 

The "You Did Good" stamp set also includes the sentiment "Congratulations Couldn't Be More Proud of You."  I stamped the sentiment using Brutus Monroe Raven Detail Ink.  

After coloring the image and die cutting the sentiment with a banner die, I used foam tape to mount both the sentiment and the image to the red brick wall card panel.  I then mounted it on black card stock.  I think this card looks great and I hope you will agree!  Thanks for stopping by my blog.  

Please follow me on Instagram at Shultz551
and watch my video tutorial for how I made this card on my You Tube Channel which is TracyShultz: https://youtu.be/rV7JjoSkvEk


Spellbinders Guest Creator

Stamp Wars 34

 Last night on Stamp Wars we had two sponsors: Ink On 3 & Pear Blossom Press.  Check out the replay for coupons/discount codes: https://...