Showing posts with label Kitchen Sink Stamps. Show all posts

Saturday, September 10, 2022

#STAMPtember 2022 Kitchen Sink Stamps

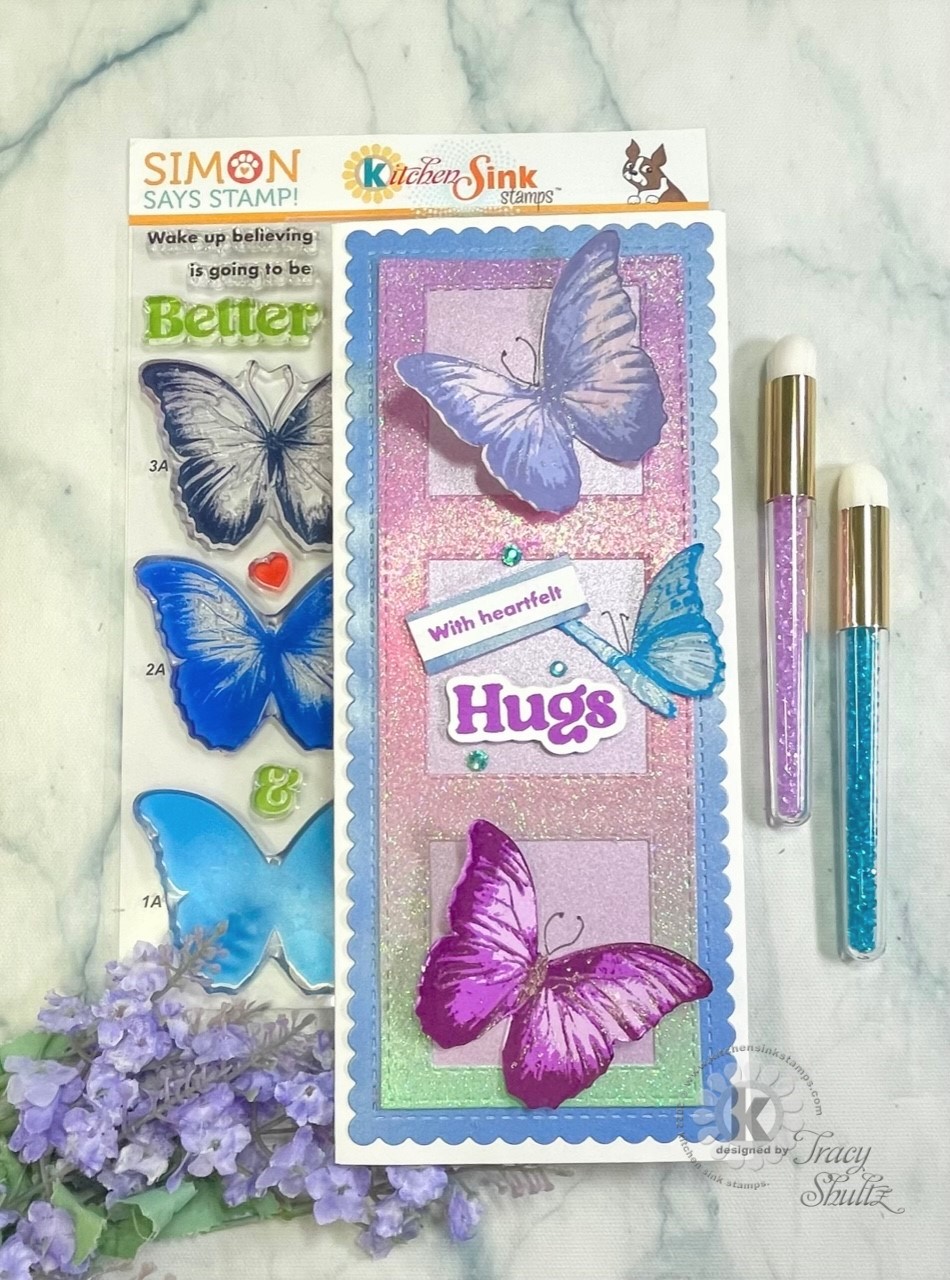
Hello! I am so excited to share the card that I created for the special STAMPtember Collaboration with Simon Says Stamps and Kitchen Sink Stamps. 


While supplies last, Simon Says Stamps will be offering this exclusive stamp and die set in collaboration with Kitchen Sink Stamps:


I created a video on my YouTube Channel demonstrating how I created my card:


I created a slimline card featuring three butterflies in hues of purple and blue:

Please see my links at the bottom of this page for my social media links.


Simon Says Stamp Blog: https://www.simonsaysstampblog.com/ 

Thanks for visiting my blog today!

--MY SOCIAL MEDIA--Follow Me You Tube: https://www.youtube.com/c/TracyShultz Blog: www.thehopefulcrafter.com Instagram: @Shultz551 Pinterest: https://www.pinterest.com/shultz551/ Facebook: https://www.facebook.com/thehopefulcrafter.com Foiling Snobs Club: https://www.facebook.com/groups/foilingsnobsclub Email: thehopefulcrafter@gmail.com PayPal:https://www.paypal.com/paypalme/tracyshultz1


Monday, June 6, 2022

Graduation Card - Kitchen Sink Stamps

Hello! Graduation season is here! Today I have a graduation card that was created using the Graduation Multi-Layer Stamp Set from Kitchen Sink Stamps. Use this link to access their website and browse all they have to offer: https://www.kitchensinkstamps.com/shop/sc/ref.cgi?storeid=*14894f2aab5d40e710c47a8a&name=Tracy_Shultz
To stamp the images I used:

Graduation Hat:

Layer 1: Altenew Silver Lake     

Layer 2: Altenew Gray Denim

Layer 3  Altenew Cloudy Night

Graduation Tassel:

Layer 1 - Orange Cream

Layer 2 - Mandarin Spice

Parchment Diploma Inks:

Layer 1: Altenew Vanilla Cream

Layer 2: Altenew Hazelnut

Layer 3:Altenew Almond Butter

Holder for the Diploma

Layer 1: Orange Cream

Layer 2: Tiki Torch

Layer 3: Mandarin Spice

I trimmed the background panel and focal panel using Gina Marie's Tribal Stitched Nested Rectangles Dies: https://wholesalecraftingsupplies.com/products/tribal-stitched-nested-rectangles-die-set-gina-marie-designs?_pos=5&_sid=a97f8d3c3&_ss=r

Wishing all the graduations the best of luck in the future! 

Thanks for visiting my blog today!

--MY SOCIAL MEDIA-- You Tube: https://www.youtube.com/c/TracyShultz Blog: www.thehopefulcrafter.com Instagram: @Shultz551 Pinterest: https://www.pinterest.com/shultz551/ Facebook: https://www.facebook.com/thehopefulcrafter.com Email: thehopefulcrafter@gmail.com


Monday, May 2, 2022

Kitchen Sink Stamps New Release

 Hello! Today is new release day for Kitchen Sink Stamps. There are two new stamp sets: Ribbon of Hope and Tiger Lilly.  I have a new video with step by step stamping on my YouTube Channel: https://youtu.be/YFa3-Zebfz8

Ribbon of Hope 

Tiger Lilly


Check out my video with step by step instructions:


Thanks for visiting my blog today!

--MY SOCIAL MEDIA-- You Tube: https://www.youtube.com/c/TracyShultz Blog: www.thehopefulcrafter.com Instagram: @Shultz551 Pinterest: https://www.pinterest.com/shultz551/ Facebook: https://www.facebook.com/thehopefulcrafter.com Email: thehopefulcrafter@gmail.com

Monday, February 28, 2022

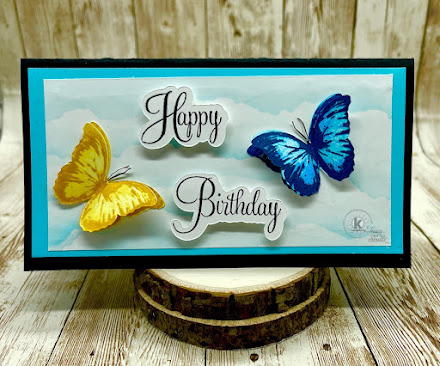
Kitchen Sink Stamps - Butterfly Birthday

 Hello! Today I have a mini-slimline card that I made to help promote the Mod Squad Challenge Blog which has been sponsored by Kitchen Sink Stamps. The Mod Squad Challenge page can be found here: https://modsquadchallenge.com/birthday-butterflies/

The deadline to enter the current challenged is 12 p.m. EST on 2/28/2022  The Mod Squad Challenge is a card challenge. The designer selects a theme, creates a card for the theme, and then card markers entire their cards.  There is a $25 gift card for Kitchen Sink Stamps given to one random winner. There are also three top cards selected by the designer (no prize, but bragging rights!).


To create my mini-slimline card I used the Butterflies stamp set from Kitchen Sink Stamps and my sentiment came from the Words 4 Celebrating Stamp Set. I also used the Cloudy Skies Stencil from Kitchen Sink Stamps. 
Order here: Kitchen Sink Stamps:

These are the steps I took to create the card:
1. Using the free SVG cut files available from Kitchen Sink Stamps, I stamped the smaller open winged butterfly SVG (with and without antenna) using the following Catherine Pooler Ink (Starting with Layer 1):
  • Layer 1: Oh Boy!
  • Layer 2: Something Borrowed
  • Layer 3: Juniper Mist (Stamped off 1 time)
I repeated these steps with the following Catherine Pooler Ink  (starting with Layer 1):
  • Layer 1: Chiffon
  • Layer 2: Limoncello
  • Layer 3: Tiara
2.  From the Words 4 Celebrating stamps set, I used to SVG files and stamped Happy Birthday with Versafine Clair Nocturne Ink. 
3. Using the Cloudy Skies Stencil and Catherine Pooler Oh Boy ink, I ink blended clouds for the background panel (size: 2.75" wide x 5.75" tall). 
4. Using Oh Boy Ink from Catherine Pooler, I swiped my ink pad directly to another piece of paper to create a mat layer (3" wide x 6" tall) 
5. Using black card stock I created a black card base (size 3.25 wide x 6.25" tall) and adhered both the Mat Panel and the cloud back ground panel. 
6. Using foam tape I adhered the sentiment to the cloud layer.
7.  I adhered the butterflies without antenna flat to the cloud panel. I adhered the butterflies with antenna with a thin line of glue along the body of the butterfly and lined them with the flat butterflies. 
Thank you for visiting my Blog - have a hopeful day!


Order here Catherine Pooler Ink: Catherine Pooler Ink:https://shop.catherinepooler.com/?aff=111

My Social Media:
You Tube: https://www.youtube.com/c/TracyShultz Blog: www.thehopefulcrafter.com Instagram: @Shultz551 Pinterest: https://www.pinterest.com/shultz551/ Facebook: https://www.facebook.com/thehopefulcrafter.com Email: thehopefulcrafter@gmail.com


Monday, February 7, 2022

Kitchen Sink Stamps - Get Well Teddy

Hello!  Today I have another adorable Teddy Bear Card - this one a Get Well Card featuring the Get Well Teddy Multistep Stamp and the AH-LO-HAA Printable Background for toner foiling (Minc foiling) Water Splashes (I think they look like flourishes)Be sure to check out these and all the amazing Kitchen Sink Stamps: here: https://www.kitchensinkstamps.com/shop/sc/ref.cgi?storeid=*14894f2aab5d40e710c47a8a&name=Tracy_Shultz

For a step by step how to video, please click on the link below to my YouTube Channel:
 https://youtu.be/29PxnJrlAF0

I used my Brother Scan and Cut to cut out the free SVG digital cut file for the Carnations and the Teddy Bear provided free at the time of purchase by Kitchen Sink Stamps. This is a digital file for use on all electronic cutting machines and is free when you purchase any stamp set from Kitchen Sink Stamps. These offer a free die cut of your stamps. You must put the SVG file in your card before you check out. If you purchase them after you check out they cost .99 cents. They are sent directly to your email and you have a limited time to then download and save the files to your computer. I like using the SVG files because when cut out they provide a jig that helps with alignment. 

I stamped the Carnations with these Catherine Pooler Ink colors: 
Stems Step 1: Eucalyptus
Stems Step 2: Green Tea
Flowers Step 1: It's a Girl
Flowers Step 2: Tutti Fruity
Flowers Step 3: Party Dress
 

For the Teddy Bear, I used the following Altenew Inks:
Step 1: Rocky Shores
Step 2: Mocha
Step 3: Espresso
Step 4: Versafine Clair Nocturne Ink

I foiled the Water Splashes Digi Background with pink hearts toner (minc) foil. I selected that background because it reminded me flourishes. I used the Altenew Fluted Oval Dies for the large pink oval and the foiled oval. I used a scalloped oval die to cut the light pink foil centerpiece that the Teddy Bear sits inside. I used foam tape to pop up the Teddy Bear and trimmed down the carnations to make a small bouquet for the Teddy Bear to hold. I used the Get Well Soon sentiment from the Get Well Teddy stamp set on my card. 

List of products uses:
Kitchen Sink Stamps:
  • Get Well Teddy Stamp
  • AH-LO-HAA Printable Background for toner foiling (Minc foiling) Water Splashes
Be sure to check out these and all the amazing Kitchen Sink Stamps: here: https://www.kitchensinkstamps.com/shop/sc/ref.cgi?storeid=*14894f2aab5d40e710c47a8a&name=Tracy_Shultz

Altenew Ink: https://shrsl.com/2pq1l Catherine Pooler Inks:https://shop.catherinepooler.com/?aff=111 Toner (Minc) Foil: H&H Signs (Toner Foil): https://www.hhsignsupply.com/productcart/pc/Textile-Foils-c853.htm?idaffiliate=154 Minc Machine: https://shrsl.com/38fxs Minc Transfer Folders: https://shrsl.com/3cuux Sizzix Fluted Oval Dies: https://shrsl.com/3dh4v Accent Opaque White 8.5” x 11” Cardstock Paper, 100lb: https://www.amazon.com/dp/B06XMXQTRX?ref=exp_nancystamps_dp_vv_d&th=1 Best Craft Tape (Yellow Tape) https://shrsl.com/3auob Bearly Art - Precision Craft Glue - The Original: https://shrsl.com/39k8w Altenew - Cutting Mat (SBC): https://shrsl.com/38ox0 Altenew-Cutting Mat (AN): https://shrsl.com/38oxu Hero Arts Ultra Clean: https://shrsl.com/38ybb Cutterbee Scissors: https://shrsl.com/3c5xy MISTI / My Sweet Petunia https://shrsl.com/31n8x Filmora (Video Editing Software): https://shrsl.com/2yrp6 Foiling Snobs Club: https://www.facebook.com/groups/foilingsnobsclub Donations to this channel: PayPal:https://www.paypal.com/paypalme/tracyshultz1 You Tube: https://www.youtube.com/c/TracyShultz Blog: www.thehopefulcrafter.com Instagram: @Shultz551 Pinterest: https://www.pinterest.com/shultz551/ Facebook: https://www.facebook.com/thehopefulcrafter.com Email: thehopefulcrafter@gmail.com

Monday, January 31, 2022

Teddy Bear Valentine's Day Card | Kitchen Sink Stamps

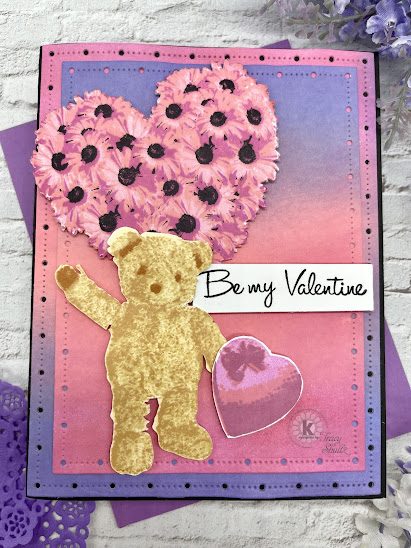
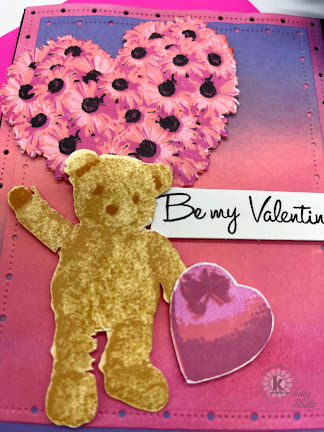
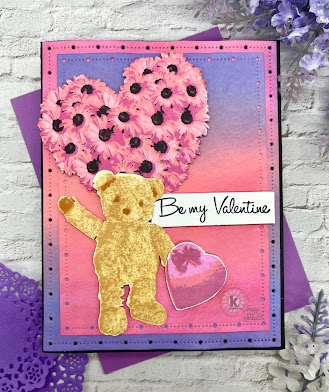
Hello!  Today I have an adorable Teddy Bear Valentine's Day Card featuring several stamps from Kitchen Sink Stamps. I used Teddy Bear Wishes, Sweetheart Daisies, and Love for Ducky and Teddy Stamp sets. Be sure to check out these and all the amazing Kitchen Sink Stamps: here: https://www.kitchensinkstamps.com/shop/sc/ref.cgi?storeid=*14894f2aab5d40e710c47a8a&name=Tracy_Shultz

I used my Brother Scan and Cut to cut out the free SVG digital cut file for the Sweetheart Daisies provided by Kitchen Sink Stamps. This is a digital file for use on all electronic cutting machines and is free when you purchase any stamp set from Kitchen Sink Stamps. These offer a free die cut of your stamps. You must put the SVG file in your card before you check out. If you purchase them after you check out they cost .99 cents. They are sent directly to your email and you have a limited time to then download and save the files to your computer. I like using the SVG files because when cut out they provide a jig that helps with alignment. 
I stamped the Sweetheart Daisies with these Catherine Pooler Ink colors: 
Step 1: It's a Girl
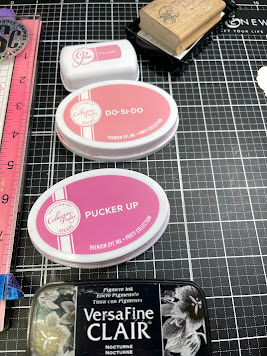
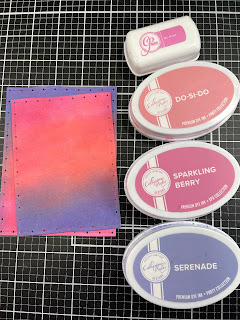
Step 2: Do-Si-Do
Step 3: Pucker Up
Step 4: VersaFine Clair Nocturne Ink
 
For the Teddy Bear, I used the following Altenew Inks:
Step 1: Vanilla Cream
Step 2: Hazelnut
Step 3: Almond Butter
Step 4: Milk Chocolate
For the box heart shaped candy that the Teddy Bear is holding, 
I used the following Catherine Pooler inks:
Step 1: It's a Girl
Step 2: Do-Si-Do
Step 3: Sparkling Berry
Step 4: Serenade
I used the same inks listed above (for the box of candy) to ink blend both the background and the mat layers of my card. I ink blended the background with Domed Foam Blending tools. I stamped the Be My Valentine sentiment with VersaFine Clair Nocturne Ink on white cardstock.  
I used the Gina Marie Designs Big and Little Chain Reaction die 
to cut out both my mat layer and my card panel and foam tape to pop up everything on the panel including the Sweetheart Daisies, Teddy Bear, Candy box and sentiment.

The following is a list of the products I used:

Kitchen Sink Stamps:
  • Teddy Bear Wishes
  • Sweetheart Daisies
  • Love for Ducky and Teddy Stamp
Be sure to check out these and all the amazing Kitchen Sink Stamps: here: https://www.kitchensinkstamps.com/shop/sc/ref.cgi?storeid=*14894f2aab5d40e710c47a8a&name=Tracy_Shultz


VersaFine Clair Nocturne Ink: https://shrsl.com/38ybd

Foam Domed Blending Tools:

Gina Marie Designs, Big and Little Chain Reaction Die:

Accent Opaque White 8.5” x 11” Cardstock Paper, 100lb: https://www.amazon.com/dp/B06XMXQTRX?ref=exp_nancystamps_dp_vv_d&th=1

Bearly Art - Precision Craft Glue - The Original: https://shrsl.com/39k8w

 Altenew - Cutting Mat (SBC): https://shrsl.com/38ox0

 Altenew-Cutting Mat (AN): https://shrsl.com/38oxu

 Hero Arts Ultra Clean: https://shrsl.com/38ybb

Scrapbook Adhesives Tape Runner: https://shrsl.com/38ybh

 --MY SOCIAL MEDIA--

You Tube: https://www.youtube.com/c/TracyShultz

 Blog: www.thehopefulcrafter.com  (YOU ARE HERE)

Instagram: @Shultz551

Pinterest: https://www.pinterest.com/shultz551/

Facebook: https://www.facebook.com/thehopefulcrafter.com

 Email: thehopefulcrafter@gmail.com


Monday, January 24, 2022

Kitchen Sink Stamps - Guitar and Make a Big Statement

 Hello! I am here today with a card that I created with Kitchen Sink Stamps Guitar and Make a Big Statement stamp sets.  I also foiled the musical notes from the Tis the Season DIGI backgrounds. This card is for my son, who will be 17 years old on February 2. I made this card for him because he plays both the acoustic and electric guitars, and I hope it inspires him to keep on playing!

I created a YouTube video with step by step instructions:

To create my card,  I first stamped the four layers of the guitar using these inks:

Layer 1: Altenew Vanilla Cream

Layer 2: Altenew Hazelnut

Layer 3:Altenew Almond Butter

Layer 4:  Altenew Mocha 

I then foiled the musical notes using a sapphire blue foil with stars from H & H Foil in my mini Minc machine.

I stamped the "Make your own music" sentiment, which is included in the Guitar stamp set, with Catherine Pooler Something Borrowed ink. Then, using the SVG cut file from the Make a Big Statement stamp set, I cut the Happy Birthday SVG with my Brother Scan and Cut Machine. I used Something Borrowed ink by Catherine Pooler to then stamp the Happy Birthday sentiment. 

To assemble my card, I used two stitched rectangle dies from Paper Rose to die cut the mat layer (Sapphire Blue Foil Cardstock) and the Foiled Musical Notes panel. I adhered these to an A2 card base using two sided tape. I used foam tape to pop up the Happy Birthday and Make Your Own Music sentiments and multilayer Guitar. 

Be sure to check out these and all the amazing Kitchen Sink Stamps: here: https://www.kitchensinkstamps.com/shop/sc/ref.cgi?storeid=*14894f2aab5d40e710c47a8a&name=Tracy_Shultz

List of supplies used:

Kitchen Sink Stamps:

  • Multi Step Guitar
  • Make a Big Statement
  • Tis the Season Digi Background: Musical Notes Digi Files


Paper Rose - Dies - Stitched Rectangles: https://shrsl.com/3c836

Accent Opaque White 8.5” x 11” Cardstock Paper, 100lb: https://www.amazon.com/dp/B06XMXQTRX?ref=exp_nancystamps_dp_vv_d&th=1

Bearly Art - Precision Craft Glue - The Original: https://shrsl.com/39k8w

 Altenew - Cutting Mat (SBC): https://shrsl.com/38ox0

 Altenew-Cutting Mat (AN): https://shrsl.com/38oxu

 Hero Arts Ultra Clean: https://shrsl.com/38ybb

 --MY SOCIAL MEDIA--

You Tube: https://www.youtube.com/c/TracyShultz

 Blog: www.thehopefulcrafter.com  (YOU ARE HERE)

Instagram: @Shultz551

Pinterest: https://www.pinterest.com/shultz551/

Facebook: https://www.facebook.com/thehopefulcrafter.com

 Email: thehopefulcrafter@gmail.com


Monday, January 10, 2022

Grazing Horse Thank you Card | Kitchen Sink Stamps

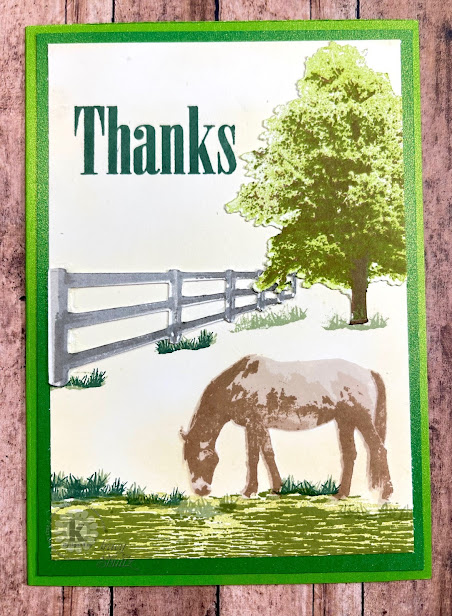
 Hello. Today I have a thank you card using several stamp sets from Kitchen Sink Stamps including Grazing Horse, Multistep Trees, Coffee Mate Greetings and Cabin by the Lake. 


To create the grazing area for my horse (the green area) I used the water (2 stamps) from the Cabin by Lake Stamp Set. I stamped layer one in Catherine Pooler Eucalyptus and layer two in Catherine Pooler Green Te. I stamped directly onto a piece of Hammermill Premium Color Copy Cardstock l00 lbs. 

Next I stamped the horse, from the Grazing Horse set using these colors of ink:
1. Step 1: Altenew Sand Dunes
2. Step 2: Altenew Sand Dunes (repeated)
3. Step 3: Altenew Rocky Shores
4. Step 4: Altenew Mocha
5. Step 5: Altenew Espresso

My card panel was stark white, so I used a blending brush to blend Altenew Vanilla Cream ink in the background.

Next I used the SVG file of the fence from the Grazing Horse set and stamped the fence using these inks:
1. Step 1:Silver Lake
2. Step 2: Gray Denim
3. Step 3: Cloudy Night

I used the SVG file of the tall tree from the Multistep Trees set. Inked the tree with these colors:
1. Layer 4: Altenew Espresso
2. Layer 3: Catherine Pooler Eucalyptus
3. Layer 2:  Catherine Pooler Green Tea
4. Layer 1: Catherine Pooler Lime Rickey

I used the grass from the Grazing Horse to stamp some grass under the fence posts and the tree. I also stamped some grass around the bottom of the card near the horse. I used two colors of Catherine Pooler ink for the grass. Layer one was Catherine Pooler Sage and Layer two was Catherine Pooler Spruce.

Finally, I stamped the Thanks sentiment from the Coffee Mate Greetings set using Catherine Pooler Spruce ink. 

Be sure to check out these and all the amazing Kitchen Sink Stamps: here: https://www.kitchensinkstamps.com/shop/sc/ref.cgi?storeid=*14894f2aab5d40e710c47a8a&name=Tracy_Shultz

List of supplies used:

Kitchen Sink Stamps:

  • Grazing Horse
  • Cabin by the Lake
  • Trees
  • Coffee Mate Greetings

Bearly Art - Precision Craft Glue - The Original: https://shrsl.com/39k8w

 Altenew - Cutting Mat (SBC): https://shrsl.com/38ox0

 Altenew-Cutting Mat (AN): https://shrsl.com/38oxu

 Hero Arts Ultra Clean: https://shrsl.com/38ybb

 Paper – Hammermill Premium Color Copy Cover (100 lbs.): hFilmora (Video Editing Software): https://shrsl.com/2yrp6

--MY SOCIAL MEDIA--

You Tube: https://www.youtube.com/c/TracyShultz

 Blog: www.thehopefulcrafter.com

Instagram: @Shultz551

Pinterest: https://www.pinterest.com/shultz551/

Facebook: https://www.facebook.com/thehopefulcrafter.com

 Email: thehopefulcrafter@gmail.com


Monday, December 27, 2021

Watercolor Thanks | Kitchen Sink Stamps

  Hello! Today I created a card for the Kitchen Sink Stamps Design Team. To create my card, I used the Watercolor Thanks Stamp Set, the SVG Cut File for the Watercolor Thanks Stamp Set, and the Buffalo Plaid from the Extended Plaids Printable Background (for FOILING).

Kitchen Sink Stamps: https://www.kitchensinkstamps.com/shop/sc/ref.cgi?storeid=*14894f2aab5d40e710c47a8a&name=Tracy_Shultz

The Foiled Background

To create my card, I started with the background. I used my laser printer and printed the Buffalo Plaid from the Extended Plaids Printable Background set. I foiled with red foil, using my Mini Minc Machine. I die cut the panel with a stitched rectangle die. Below that, I die cut with a stitched rectangle die a green foil cardstock panel, cutting it slightly larger than the plaid foil layer and using it as a mat layer. I adhered the layers to a black A2 (4.25" x 5.5") card base. 

The Watercolor Thanks Stamped Sentiment

I used the SVG cut file from the Watercolor Thanks Stamp set to cut out the outline of the word thanks. I put this in my stamp positioning tool and stamped using the following Color Recipe (stamping in reverse order):

  • Layer 4: Catherine Pooler Cranberry Fizz
  • Layer 3: Catherine Pooler Rouge (stamped off one time to decrease the intensity of the color)
  • Layer 2: Catherine Pooler Rose Petals
  • Layer 1: Catherine Pooler Polished (stamped off one time to decrease the intensity of the color)

Black Mat for the Watercolor Thanks Sentiment
Using a small stitched rectangle die, I cut a mat layer for the Watercolor Thanks Sentiment. I glued the stamped Thanks sentient to black rectangle and then adhered them to the foiled card panel.

                                                     Mini Sentiment
I stamped the "so much" mini sentiment with Versafine Clair Nocturne Ink. I stamped this onto a banner (white cardstock) that I cut out from the Watercolor Thanks SVG cut files. I trimmed a piece of black card stock to create a mat layer. 

You can find all the products that I used here:

Kitchen Sink Stamps: https://www.kitchensinkstamps.com/shop/sc/ref.cgi?storeid=*14894f2aab5d40e710c47a8a&name=Tracy_Shultz

(use code ModSquad2021 for discount before Checkout)

Thank you for checking out my blog today. 

My Social Media: 

You Tube: https://www.youtube.com/c/TracyShultz

Blog: www.thehopefulcrafter.com

Instagram: @Shultz551

Pinterest: https://www.pinterest.com/shultz551/

Facebook: https://www.facebook.com/thehopefulcrafter.com


Spellbinders Guest Creator

Blue Knight Silhouette Grasses, Pan Pastels & Ink Blending.