Showing posts with label KSS. Show all posts
Showing posts with label KSS. Show all posts
Monday, March 7, 2022

Monday, February 7, 2022
Kitchen Sink Stamps - Get Well Teddy
Hello! Today I have another adorable Teddy Bear Card - this one a Get Well Card featuring the Get Well Teddy Multistep Stamp and the AH-LO-HAA Printable Background for toner foiling (Minc foiling) Water Splashes (I think they look like flourishes). Be sure to check out these and all the amazing Kitchen Sink Stamps: here: https://www.kitchensinkstamps.com/shop/sc/ref.cgi?storeid=*14894f2aab5d40e710c47a8a&name=Tracy_Shultz

https://youtu.be/29PxnJrlAF0


List of products uses:
I used my Brother Scan and Cut to cut out the free SVG digital cut file for the Carnations and the Teddy Bear provided free at the time of purchase by Kitchen Sink Stamps. This is a digital file for use on all electronic cutting machines and is free when you purchase any stamp set from Kitchen Sink Stamps. These offer a free die cut of your stamps. You must put the SVG file in your card before you check out. If you purchase them after you check out they cost .99 cents. They are sent directly to your email and you have a limited time to then download and save the files to your computer. I like using the SVG files because when cut out they provide a jig that helps with alignment.
I stamped the Carnations with these Catherine Pooler Ink colors:
Stems Step 1: Eucalyptus
Stems Step 2: Green Tea
Flowers Step 1: It's a Girl
Flowers Step 2: Tutti Fruity
Flowers Step 3: Party Dress
For the Teddy Bear, I used the following Altenew Inks:
Step 1: Rocky Shores
Step 2: Mocha
Step 3: Espresso
Step 4: Versafine Clair Nocturne Ink
I foiled the Water Splashes Digi Background with pink hearts toner (minc) foil. I selected that background because it reminded me flourishes. I used the Altenew Fluted Oval Dies for the large pink oval and the foiled oval. I used a scalloped oval die to cut the light pink foil centerpiece that the Teddy Bear sits inside. I used foam tape to pop up the Teddy Bear and trimmed down the carnations to make a small bouquet for the Teddy Bear to hold. I used the Get Well Soon sentiment from the Get Well Teddy stamp set on my card.
Kitchen Sink Stamps:
- Get Well Teddy Stamp
- AH-LO-HAA Printable Background for toner foiling (Minc foiling) Water Splashes
Be sure to check out these and all the amazing Kitchen Sink Stamps: here: https://www.kitchensinkstamps.com/shop/sc/ref.cgi?storeid=*14894f2aab5d40e710c47a8a&name=Tracy_Shultz
Altenew Ink: https://shrsl.com/2pq1l
Catherine Pooler Inks:https://shop.catherinepooler.com/?aff=111
Toner (Minc) Foil: H&H Signs (Toner Foil): https://www.hhsignsupply.com/productcart/pc/Textile-Foils-c853.htm?idaffiliate=154
Minc Machine: https://shrsl.com/38fxs
Minc Transfer Folders: https://shrsl.com/3cuux
Sizzix Fluted Oval Dies: https://shrsl.com/3dh4v
Accent Opaque White 8.5” x 11” Cardstock Paper, 100lb: https://www.amazon.com/dp/B06XMXQTRX?ref=exp_nancystamps_dp_vv_d&th=1
Best Craft Tape (Yellow Tape) https://shrsl.com/3auob
Bearly Art - Precision Craft Glue - The Original: https://shrsl.com/39k8w
Altenew - Cutting Mat (SBC): https://shrsl.com/38ox0
Altenew-Cutting Mat (AN): https://shrsl.com/38oxu
Hero Arts Ultra Clean: https://shrsl.com/38ybb
Cutterbee Scissors: https://shrsl.com/3c5xy
MISTI / My Sweet Petunia https://shrsl.com/31n8x
Filmora (Video Editing Software): https://shrsl.com/2yrp6
Foiling Snobs Club: https://www.facebook.com/groups/foilingsnobsclub
Donations to this channel: PayPal:https://www.paypal.com/paypalme/tracyshultz1
You Tube: https://www.youtube.com/c/TracyShultz
Blog: www.thehopefulcrafter.com
Instagram: @Shultz551
Pinterest: https://www.pinterest.com/shultz551/
Facebook: https://www.facebook.com/thehopefulcrafter.com
Email: thehopefulcrafter@gmail.com
Monday, January 31, 2022
Teddy Bear Valentine's Day Card | Kitchen Sink Stamps
Hello! Today I have an adorable Teddy Bear Valentine's Day Card featuring several stamps from Kitchen Sink Stamps. I used Teddy Bear Wishes, Sweetheart Daisies, and Love for Ducky and Teddy Stamp sets. Be sure to check out these and all the amazing Kitchen Sink Stamps: here: https://www.kitchensinkstamps.com/shop/sc/ref.cgi?storeid=*14894f2aab5d40e710c47a8a&name=Tracy_Shultz
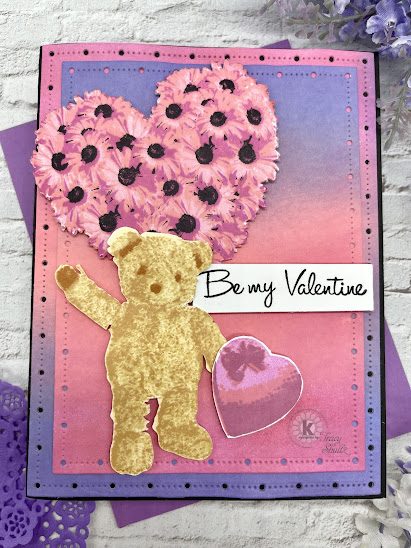
I used my Brother Scan and Cut to cut out the free SVG digital cut file for the Sweetheart Daisies provided by Kitchen Sink Stamps. This is a digital file for use on all electronic cutting machines and is free when you purchase any stamp set from Kitchen Sink Stamps. These offer a free die cut of your stamps. You must put the SVG file in your card before you check out. If you purchase them after you check out they cost .99 cents. They are sent directly to your email and you have a limited time to then download and save the files to your computer. I like using the SVG files because when cut out they provide a jig that helps with alignment.
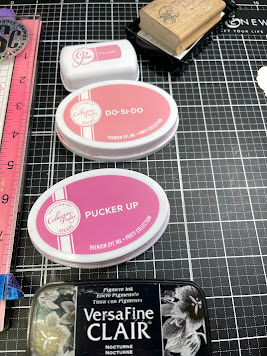
I stamped the Sweetheart Daisies with these Catherine Pooler Ink colors:
Step 1: It's a Girl
Step 2: Do-Si-Do
Step 3: Pucker Up
Step 4: VersaFine Clair Nocturne Ink
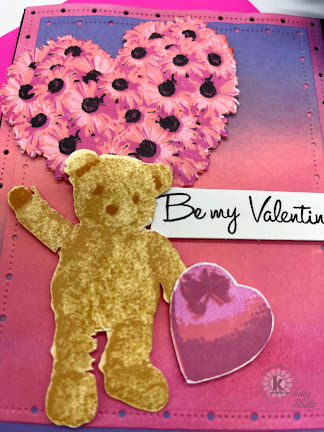
For the Teddy Bear, I used the following Altenew Inks:
Step 1: Vanilla Cream
Step 2: Hazelnut
Step 3: Almond Butter
Step 4: Milk Chocolate
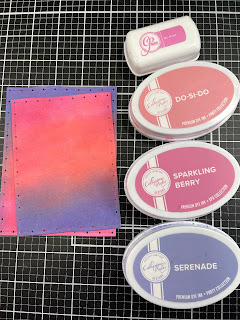
For the box heart shaped candy that the Teddy Bear is holding,
I used the following Catherine Pooler inks:
Step 1: It's a Girl
Step 2: Do-Si-Do
Step 3: Sparkling Berry
Step 4: Serenade
I used the same inks listed above (for the box of candy) to ink blend both the background and the mat layers of my card. I ink blended the background with Domed Foam Blending tools. I stamped the Be My Valentine sentiment with VersaFine Clair Nocturne Ink on white cardstock.
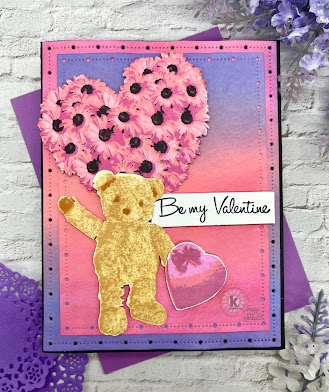
I used the Gina Marie Designs Big and Little Chain Reaction die
to cut out both my mat layer and my card panel and foam tape to pop up everything on the panel including the Sweetheart Daisies, Teddy Bear, Candy box and sentiment.
Kitchen Sink Stamps:
- Teddy Bear Wishes
- Sweetheart Daisies
- Love for Ducky and Teddy Stamp
Be sure to check out these and all the amazing Kitchen Sink Stamps: here: https://www.kitchensinkstamps.com/shop/sc/ref.cgi?storeid=*14894f2aab5d40e710c47a8a&name=Tracy_Shultz
Catherine Pooler Ink:https://shop.catherinepooler.com/?aff=111
Altenew Ink: https://shrsl.com/2pq1l
VersaFine Clair Nocturne Ink: https://shrsl.com/38ybd
Foam Domed Blending Tools:
- Ink Blending Tool and (2) 10-Pack of Replacement Domed Applicators: https://shrsl.com/38owt
- Ink Blending Tool and (1) 10-Pack of Replacement Domed Applicators: https://shrsl.com/38owv
- Ink Blending Tool with 5 Domed Foam Applicators: https://shrsl.com/38ow
Gina Marie Designs, Big and Little Chain Reaction Die:
Accent Opaque White 8.5” x 11” Cardstock Paper, 100lb: https://www.amazon.com/dp/B06XMXQTRX?ref=exp_nancystamps_dp_vv_d&th=1
Bearly Art - Precision Craft Glue - The Original: https://shrsl.com/39k8w
Scrapbook Adhesives Tape Runner:
https://shrsl.com/38ybh
--MY SOCIAL MEDIA--
You Tube: https://www.youtube.com/c/TracyShultz
Instagram: @Shultz551
Pinterest: https://www.pinterest.com/shultz551/
Facebook: https://www.facebook.com/thehopefulcrafter.com
Monday, January 10, 2022
Grazing Horse Thank you Card | Kitchen Sink Stamps
Hello. Today I have a thank you card using several stamp sets from Kitchen Sink Stamps including Grazing Horse, Multistep Trees, Coffee Mate Greetings and Cabin by the Lake.
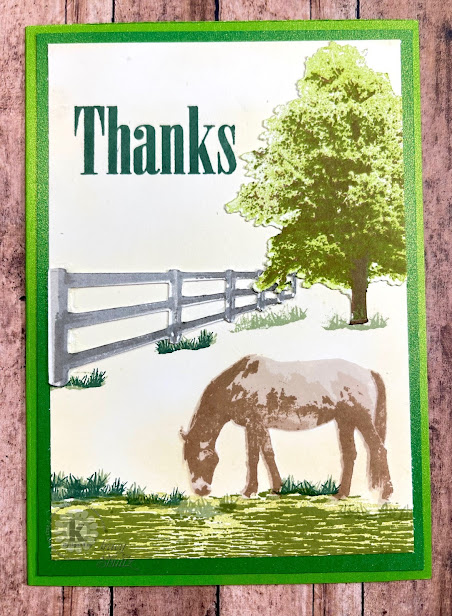
Next I stamped the horse, from the Grazing Horse set using these colors of ink:
1. Step 1: Altenew Sand Dunes
2. Step 2: Altenew Sand Dunes (repeated)
3. Step 3: Altenew Rocky Shores
4. Step 4: Altenew Mocha
5. Step 5: Altenew Espresso
My card panel was stark white, so I used a blending brush to blend Altenew Vanilla Cream ink in the background.
Next I used the SVG file of the fence from the Grazing Horse set and stamped the fence using these inks:
1. Step 1:Silver Lake
2. Step 2: Gray Denim
3. Step 3: Cloudy Night
I used the SVG file of the tall tree from the Multistep Trees set. Inked the tree with these colors:
1. Layer 4: Altenew Espresso
2. Layer 3: Catherine Pooler Eucalyptus
3. Layer 2: Catherine Pooler Green Tea
4. Layer 1: Catherine Pooler Lime Rickey
I used the grass from the Grazing Horse to stamp some grass under the fence posts and the tree. I also stamped some grass around the bottom of the card near the horse. I used two colors of Catherine Pooler ink for the grass. Layer one was Catherine Pooler Sage and Layer two was Catherine Pooler Spruce.
Finally, I stamped the Thanks sentiment from the Coffee Mate Greetings set using Catherine Pooler Spruce ink.
Be sure to check out these and all the amazing Kitchen Sink Stamps: here: https://www.kitchensinkstamps.com/shop/sc/ref.cgi?storeid=*14894f2aab5d40e710c47a8a&name=Tracy_Shultz
List of supplies used:
Kitchen Sink Stamps:
- Grazing Horse
- Cabin by the Lake
- Trees
- Coffee Mate Greetings
Catherine Pooler Ink:https://shop.catherinepooler.com/?aff=111
Altenew Ink: https://shrsl.com/2pq1l
Bearly Art - Precision Craft Glue - The Original: https://shrsl.com/39k8w
--MY SOCIAL MEDIA--
You Tube: https://www.youtube.com/c/TracyShultz
Instagram: @Shultz551
Pinterest: https://www.pinterest.com/shultz551/
Facebook: https://www.facebook.com/thehopefulcrafter.com
Monday, December 27, 2021
Watercolor Thanks | Kitchen Sink Stamps
Hello! Today I created a card for the Kitchen Sink Stamps Design Team. To create my card, I used the Watercolor Thanks Stamp Set, the SVG Cut File for the Watercolor Thanks Stamp Set, and the Buffalo Plaid from the Extended Plaids Printable Background (for FOILING).
Kitchen Sink Stamps: https://www.kitchensinkstamps.com/shop/sc/ref.cgi?storeid=*14894f2aab5d40e710c47a8a&name=Tracy_Shultz

The Foiled Background
To create my card, I started with the background. I used my laser printer and printed the Buffalo Plaid from the Extended Plaids Printable Background set. I foiled with red foil, using my Mini Minc Machine. I die cut the panel with a stitched rectangle die. Below that, I die cut with a stitched rectangle die a green foil cardstock panel, cutting it slightly larger than the plaid foil layer and using it as a mat layer. I adhered the layers to a black A2 (4.25" x 5.5") card base.
The Watercolor Thanks Stamped Sentiment
I used the SVG cut file from the Watercolor Thanks Stamp set to cut out the outline of the word thanks. I put this in my stamp positioning tool and stamped using the following Color Recipe (stamping in reverse order):
- Layer 4: Catherine Pooler Cranberry Fizz
- Layer 3: Catherine Pooler Rouge (stamped off one time to decrease the intensity of the color)
- Layer 2: Catherine Pooler Rose Petals
- Layer 1: Catherine Pooler Polished (stamped off one time to decrease the intensity of the color)

Black Mat for the Watercolor Thanks Sentiment
Using a small stitched rectangle die, I cut a mat layer for the Watercolor Thanks Sentiment. I glued the stamped Thanks sentient to black rectangle and then adhered them to the foiled card panel.
Mini Sentiment
I stamped the "so much" mini sentiment with Versafine Clair Nocturne Ink. I stamped this onto a banner (white cardstock) that I cut out from the Watercolor Thanks SVG cut files. I trimmed a piece of black card stock to create a mat layer.
You can find all the products that I used here:
Kitchen Sink Stamps: https://www.kitchensinkstamps.com/shop/sc/ref.cgi?storeid=*14894f2aab5d40e710c47a8a&name=Tracy_Shultz
(use code ModSquad2021 for discount before Checkout)
Thank you for checking out my blog today.
My Social Media:
You Tube: https://www.youtube.com/c/TracyShultz
Blog: www.thehopefulcrafter.com
Instagram: @Shultz551
Pinterest: https://www.pinterest.com/shultz551/
Facebook: https://www.facebook.com/thehopefulcrafter.com
Email: thehopefulcrafter@gmail.com
Monday, December 20, 2021
Angels Wings | Kitchen Sink Stamps
Hello! Today I created a card for the Kitchen Sink Stamps Design Team. To create my card, I used the Angels Wings and Musical Things for Teddy stamp sets. I always imagine Angels have more than one set of wings. I imagine they would be layered, so I layered two sets from the Angel Wings Stamp Set. This is a Christmas Card and reminds us of the important role that Angels played in the Christmas Story.
Kitchen Sink Stamps: https://www.kitchensinkstamps.com/shop/sc/ref.cgi?storeid=*14894f2aab5d40e710c47a8a&name=Tracy_Shultz

To create my card, I used the SVG file that includes the angel wings, halo, several sentiments and banners. I stamped the Angel Wings in these colors in reverse order:
5. Altenew Gray Denim
4. Altenew Silver Lakes
3. Momento Teal Zeal (stamped off to make a lighter shade)
2. Momento Summer Sky twice (to deepen the shade)
1. Momento Summer Sky (once)
I stamped two sets of wings. Next, I stamped the halo using the following inks in reverse order:
3. Catherine Pooler Catching Rays
2. Catherine Pooler Catching Rays (stamped off to make a lighter shade)
3. Catherine Pooler Chiffon
I used Memento Teal Zeal ink to stamp the sentiment.
Next I used the Musical Things for Teddy Stamp stamp. The Harp has three layers and I used these inks:
3. Rich Cocoa (Momento)
2. Peanut Brittle (Momento)
1. Cantelop (Momento)
Next I used the Kitchen Sink Stamps Cloudy Skies Stencil to ink blend some soft clouds in the background.
To finish my card I layered the Angel wings and used foam to pop up the top layer, as well as the halo. I also stamped the musical notes and star from the Musical Things for Teddy set. I used Catching Rays ink from Catherine Pooler.
You can find the stamps that I used here:
Kitchen Sink Stamps: https://www.kitchensinkstamps.com/shop/sc/ref.cgi?storeid=*14894f2aab5d40e710c47a8a&name=Tracy_Shultz
(use code ModSquad2021 for discount before Checkout)
Thank you for checking out my blog today.
My Social Media:
You Tube: https://www.youtube.com/c/TracyShultz
Blog: www.thehopefulcrafter.com
Instagram: @Shultz551
Pinterest: https://www.pinterest.com/shultz551/
Facebook: https://www.facebook.com/thehopefulcrafter.com
Email: thehopefulcrafter@gmail.com
''''''''''''''''''''''''''''
Subscribe to:
Posts (Atom)
Spellbinders Guest Creator

-
 Hello. Thank you for visiting my blog today. I am here as part of the Monthly Themed Hop. The theme for this month of December is Snowmen an...
 -
 I am excited to submit this card to the 2019 Fall | Winter Coffee Lovers Blog Hop. There are over 80 sponsors participating. Some of thes...
 -
 #collectedcraftycollabs #collectedcraftycollabshop Hello. Thank you for visiting my blog today. I am part of the Monthly Themed Hop Gro...