Wednesday, August 19, 2020

Flamingos and Wildgrass - Blue Knight Rubber Stamps

Hello and Welcome to my Blog!

I am so excited today to be back again with another beautiful stamp from Blue Knight Rubber Stamps. I made two cards from one stamp set. 

 I created a video on my You Tube Channel that details how I made the card:

I created the above card first by creating my background with PanPastels. I used Magenta, Ultramarine Blue, Turquoise, Burnt Sienna Tint and Bronze. I used the Colorless Blender to blend the background colors. Then I used a stamp positioning tool to stamp the Wild Grass and the Flamingos using Versafine Clair Nocturne ink. I used the sentiment "Happy Anniversary" from Mini Greetings 1 and two birds from the Birds 2 stamp set to finish the card. I sprayed the card with Krylon Mat sealant and then placed the card panel on a black card base. It is such a gorgeous stamp set and it looks great with the Pan Pastels as the background.


For my second card, I used the Blue Knight Rubber Stamps Cloud Stencil and Turquoise PanPastel to create clouds. I then stamped the images from the Stamp Set with Versafine Clair Nocturne Black Ink. I sprayed the card with Krylon Mat sealant and then placed the card panel on a black card base.

You can find each of today's featured stamps HERE https://blueknightrubberstamps.com/
at the Blue Knight Rubber Stamps web store. And... don't forget to join us at the Fan Group and YouTube Channel: Fans of Blue Knight Rubber Stamps (Facebook group) is HERE https://www.facebook.com/groups/29747...
and the Blue Knight Rubber Stamps YouTube Channel is HERE https://www.youtube.com/channel/UCOlr...
Thank you for stopping by my blog today. Have a hopeful day!

Find me on Social Media:  You Tube: https://www.youtube.com/c/TracyShultz  Instagram: @Shultz551  Blog: https://thehopefulcrafter.blogspot.com
 Pinterest: https://www.pinterest.com/shultz551
Email: thehopefulcrafter@gmail.com

Saturday, August 15, 2020

Pink Zinnia Createful Heart Design Team

 Hello! Welcome to my Blog. 

Today I am sharing a layered card featuring the super cute " Summer Zinnia" Digital Stamp from Createful Heart Designs:  https://marketplace.zibbet.com/createful-heart-design/summer-zinnia-digital-stamp


 I created this card by following these steps:

 1. Printed the image using my inkjet printer. 

2. Colored the image with Ohuhu Alcohol Markers. 

3. Using my Brother Scan n Cut to cut the image.

4. Selected Pink Polka Dot Pattern Paper to layer beneath the colored image. Layered that on top of neon green card stock (with cherries embossed).  Used a corner chomper to round the corners on all the layered paper pieces. Glued the colored image and all the layered papers to the hot pink card base. 

5. Die cut the sentiment "Friend” from a three-layer die made by HoneyBee Stamps. Using Versafine Claire Ink “Charming Pink” I heat embossed the stamped words “Thank You For Being A Friend” from HoneyBee Stamps “Friend” stamp set. This ink is a pigment ink so it stays wet and you can emboss with it. I used Brutus Monroe Embossing Powder in Icicle (clear).   I used pop dots behind the small sentiment strips to give the card dimension.

 This is my 11th month as a member of the Design Team for Createful Heart Design, a digital stamp and digital paper company. The owners of Createful Heart Design, Mary, and her husband Mark draw all the digital stamps by hand and Mary designs the digital papers on her computer. It is exciting to be a part of this design team and I hope that you will check out their online store. Here is a link to the online shop:


Our Blog Challenges run from the 15th of the month through the 13th of the following month. The Blog Challenge website is: http://createfulheartcards.blogspot.com/  The theme is always Anything Goes

 Find me on Social Media!

YOU TUBE: https://www.youtube.com/c/TracyShultz

https://www.youtube.com/channel/UCXiqXIFPPsdH9cwJ0AClXMA

INSTAGRAM: @Shultz551

BLOG: https://thehopefulcrafter.blogspot.com/

PINTEREST: https://www.pinterest.com/shultz551/

EMAIL: thehopefulcrafter@gmail.com

 Thank you for visiting my blog today!  Have a hopeful day!

Wednesday, August 5, 2020

Blue Knight Rubber Stamps Wetlands Stamp

Hello and Welcome to my Blog.  Thank you for visiting today. I have two cards for the Blue Knight Rubber Stamp Design Team using the Wetlands Stamp. For my first card I used Spectra Noir Shimmer Brush Pens to create a bright and vibrant scene.  


I created a video on my You Tube Channel detailing how this card was created:


I used water color paper and water proof ink to stamp the image. I colored the water in Aquamarine and used various colors of green to color the grass and the trees. For the mountains I used white gouache paint mixed with Brutus Monroe Black Aquapigment to create the color gray. I stamped the sentiment Happy Birthday from the Blue Knight Rubber Stamps Mini Sentiments 1 set in the top left hand corner of the card. I stamped a trio of three birds from the Birds 1 stamp set in the top right hand corner of the card. I also stamped the small ducks from the Footbridge stamp set in the water. I colored the sun with Yellow Orange Aquapigment from Brutus Monroe. 


For my second card, I used Ohuhu Alcohol Markers to color a winter marshlands scene. I then used 4" Double Sided clear adhesive, covering the entire card panel, then sprinkled the entire surface with Tim Holtz Distress Glitter. This created a winter scene. 


Thank you for visiting my blog today. I hope you found some inspiration and will stop again.

You can find each of today's featured stamps HERE, at the Blue Knight Rubber Stamps web store.

And... don't forget to join us at the Fan Group and YouTube Channel:
Fans of Blue Knight Rubber Stamps (Facebook group) is HERE
and the Blue Knight Rubber Stamps YouTube Channel is HERE


My Social Media:
YOU TUBE:
INSTAGRAM: @Shultz551

Wednesday, July 29, 2020

Adding Snow to your Card - Blue Knight Rubber Stamps Winter Cardinals

Hello and welcome to my blog! I am so excited to be sharing another wonderful stamp from Blue Knight Rubber Stamps. I will be sharing two different cards using the "Winter Cardinals" stamp. The first card features "snow" created with the Marvy Snow Marker Pen. A Snow Pen can be used to highlight an area with puffy snow. It goes on wet (very similar to a white out pen). When you apply it to your card, you need to use a heat tool to make it puff up and look like snow. 
For the card above, I colored the birds with alcohol markers. I made one red, the traditional cardinal, and the other blue, for a blue bird. For the background I used the Cloud Stencil from Blue Knight Rubber Stamp and Turquoise PanPastel.

For my second card, I used glitter to make a snowy card. 
I created a video tutorial on my You Tube Channel demonstrating how I made this card:


To make the glitter snow card, I colored the image first with alcohol markers. I then adhered the image to one side of double sided adhesive. I peeled the protective backer off that side, so that the sticky was facing up. I covered the sticky panel with glitter. I used the backer paper to burnish the glitter into the panel. I then removed the protective backer from the other side and adhered the panel to a piece of black card stock, creating a mat. I then adhered that mat to an A2 sized black card base. 


You can find each of today's featured stamps HERE, at the Blue Knight Rubber Stamps web store.

And... don't forget to join us at the Fan Group and YouTube Channel:
Fans of Blue Knight Rubber Stamps (Facebook group) is HERE
and the Blue Knight Rubber Stamps YouTube Channel is HERE
List of Products used:
Double sided adhesive: Elizabeth Craft Designs Clear Double-Sided Adhesive Roll: https://www.amazon.com/dp/B00OL2F062/?ref=exp_nancystamps_dp_vv_d&th=1
Ranger Tim Holtz Distress Dry Glitter, Clear Rock Candy: https://www.amazon.com/Ranger-Distress-Stickles-Glitter-3-Ounce/dp/B0091VAVHG/ref=sr_1_1?dchild=1&keywords=tim+holtz+distress+glitter&qid=1595990736&s=arts-crafts&sr=1-1
Ohuhu Markers: https://www.amazon.com/dp/B07NRB5G3Q/?ref=exp_nancystamps_dp_vv_d
Brutus Monroe Raven Card Stock: https://www.brutusmonroe.com/products/raven-cardstock-100lb-cover
Marvy Fine Point Paper and Fabric Embellishing Snow Marker: https://www.amazon.com/Uchida-1022S-C-Fabric-Embellishing-Marker/dp/B002RW5SM4/ref=asc_df_B002RW5SM4/?tag=hyprod-20&linkCode=df0&hvadid=198100706044&hvpos=&hvnetw=g&hvrand=14071074034831583031&hvpone=&hvptwo=&hvqmt=&hvdev=c&hvdvcmdl=&hvlocint=&hvlocphy=9006066&hvtargid=pla-349368201560&psc=1

My Social Media:


Saturday, July 25, 2020

Monthly Themed Hop - Outdoor Theme and Patterned Paper

Hello and welcome to my blog. Today I am excited to be a part of the "Collected Crafty Collabs" hop. Once a month I will be participating in the hop (June-December 2020). Each month there is a different theme. This month the theme is "Outdoors and Patterned Paper."  The idea is to use up products that we don't use on a regular basis. I have plenty of patterned paper that needs used up, and I have some red rubber stamps that I purchased last year but have not had the opportunity to use frequently. I was happy to bring them together to make a fun 6x6 card. 

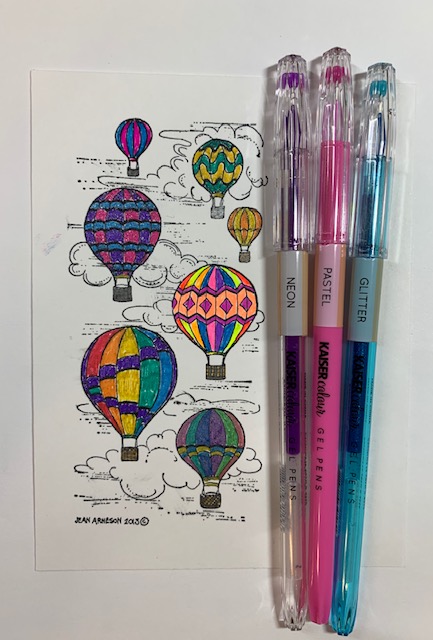
 I selected the Northwoods Rubber Stamp Set "Cabin and Canoe" and selected the image of the Hot Air Balloons and two of the sentiments.

 These are red rubber stamps. 
 I used Memento Tuxedo Black Ink the stamp. 

 This is a close up of the stamp before I colored the hot air balloons.
 I used Kaiser Craft Gel Pens to color the images. 


I selected some pattern paper with clouds from one paper pad in my stash. I picked out a camping theme paper for my second paper. This paper has campers, tents, mountains and trees.

I used Distress Oxide Ink in Speckled Egg to apply ink around the outer edge of the Congratulations Banner. I also used the Distress Oxide Ink to color over the second sentiment "The Sky's the Limit." I think the papers and the ink color compliment each other.
I die cut the hot air balloons with a tag die. I put a bow in the tag.
I also decorated the inside of my card. 

There are lots of creators participating in this hop. Please make sure to check out all the stops in the hop. Next up is Natasha at: https://handmadebytasha.co.uk/?p=1918
Thank you for visiting!

Social Media:
YOU TUBE:
https://www.youtube.com/channel/UCXiqXIFPPsdH9cwJ0AClXMA
INSTAGRAM: @Shultz551
BLOG: https://thehopefulcrafter.blogspot.com/
PINTEREST: https://www.pinterest.com/shultz551/
FACEBOOK: https://www.facebook.com/tracy.shultz
EMAIL: thehopefulcrafter@gmail.com

Full Hop Line Up:

Anna Mahtani
Marie Bingaman
Valerie Powell
Danielle Brown
Yvette Olea (Yvette Olea Creates)
Charlotte E
https://youtu.be/Szr8dXe5xzg / https://thejoyfulsoulcreates.wordpress.com/2020/07/25/collected-crafty-collabs-hop-i-like-ewe-outdoors-and-patterned-paper/
Virginia Fairchild
Lisa Wolfe
Teresa Russell
Sam McLean
Katy Ingram
Boryana Yankova
Tracy Shultz
YOU ARE HERE
Natasha Davies
Mary Ellen Driggs
Lounon Riviere
Karen Page
Donna Perisic

Here's another card that  I made using the Hot Air Balloon Stamp Set:

Wednesday, July 15, 2020

Camping Card - Best Friends Forever: Createful Heart Design Team Card

Hello! Welcome to my Blog. 
Today I am sharing a layered card featuring the super cute "Best Friends" Digital Stamp from Createful Heart Designs: https://marketplace.zibbet.com/createful-heart-design/best-friends-forever-coloring-page


 I created this card by following these steps:

1. Printed the image using my inkjet printer. 
2. Colored the image with PanPastels. 
3. I created the clouds with PanPastels using the Cloud Stencil.
4. Sprayed the colored image with Krylon to set the PanPastels into place. 
5. Die cut the image using a large rectangular postage stamp die
6. Selected Camping Themed Pattern Paper to layer the card. Glued the paper and the colored image to the card base. 
7. Die cut the sentiment "Hello." Popped the sentiment up with foam dots to the card base.
8. Die cut three evergreen trees using a die set from my stash. Popped the trees up with foam dots. 

Products used:
This is my 10th month as a member of the Design Team for Createful Heart Design, a digital stamp and digital paper company. The owners of Createful Heart Design, Mary, and her husband Mark draw all the digital stamps by hand and Mary designs the digital papers on her computer. It is exciting to be a part of this design team and I hope that you will check out their online store. Here is a link to the online shop:
https://createful-heart-design.zibbet.com/shop

Our Blog Challenges run from the 15th of the month through the 13th of the following month. The Blog Challenge website is: http://createfulheartcards.blogspot.com/  The theme is always Anything Goes

Find me on Social Media!
INSTAGRAM: @Shultz551
EMAIL: thehopefulcrafter@gmail.com

Sunday, July 5, 2020

Happy Hedgehog Blue Knight Rubber Stamps

Oh Happy Day! I am super excited to be posting my official blog entry as a design team member for Blue Knight Rubber Stamps, one of my all time favorite stamp companies. I am serving as a guest designer for the term of July - December 2020 and today is my first post for that term. You will see me post at least twice per month, sometimes more, both on my blog and on my You Tube Channel. You can find each of today's featured stamps HERE, at the Blue Knight Rubber Stamps web store.


Here is my first card for today:

 
I created a video on my You Tube Channel with step by step instructions:


Step by Step instructions:
1. Using turquoise, violet and small bit of ultramarine blue PanPastels, I colored clouds in the background using the Clouds Stencil available at Blue Knight Rubber Stamps. This stencil is a must have for anyone that uses PanPastels or does ink blending. Here is a link to the cloud stencil: https://blueknightrubberstamps.com/cloud-stencil/   The stencil is clouds on one edge and rolling hills on the other (so it is a two for one).
2Using a stamp positioning tool, I stamped the Happy Hedgehog stamp onto Bristol smooth 110 lbs. card stock size 4"x 5.25". I kept the stamp in the stamp positioning tool because I double stamped the image after coloring it with PanPastels. 
3. I colored the body of the hedgehog first, then the flower and then the grass with PanPastels. I placed the panel back into the stamp positioning tool and stamped it again with a fresh layer of ink. 
4. I used Krylon Matte Finish sealant to seal the PanPastels. Then I mounted the panel onto a 4.25" x 5.5" black card base. 
  
Here is my second card for today:
To create my second card I colored my Hedgehog, flower and grass with alcohol markers. I then masked the image with masking paper. I used the ranger sunray stencil, ink blended with distress oxide inks in squeezed lemonade and ripe persimmon, for the background. I removed the masking paper and then mounted the finished panel on purple cardstock (size 4" x 5.25"). I mounted these onto a 4.25" x 5.5" black card base. 


Thanks so much for visiting my blog today! 
Please consider subscribing so that you can receive notifications of future postings.

And... don't forget to join us at the Fan Group and YouTube Channel:
Fans of Blue Knight Rubber Stamps (Facebook group) is HERE
and the Blue Knight Rubber Stamps YouTube Channel is HERE


My Social Media:

YOU TUBE:

INSTAGRAM: @Shultz551


EMAIL: thehopefulcrafter@gmail.com

Spellbinders Guest Creator

Blue Knight Silhouette Grasses, Pan Pastels & Ink Blending.