Saturday, December 26, 2020

Sparkly Snowman - Collected Crafty Collab Finale

Hello. Thank you for visiting my blog today. I am here as part of the Monthly Themed Hop. The theme for this month of December is Snowmen and Sparkle. 
I created a card using glitter and a snowman. I used the Catherine Pooler Stamp "Build A Snowman."  I created YouTube Video demonstrating how to apply glitter to a card panel:                                                                                                               
To create this card, I used Tumbled Glass distress ink and a domed sponge dauber to create snow drifts at the bottom of my card. I also used the dauber to ink the edges of the panel. I stamped the images and sentiment using Versafine Clair Nocturne Ink. 

For the blue snowflakes (stamps from the stamp set) I used Something Borrowed (blue) ink by Catherine Pooler Ink. 
The photos above and below are of the card when it was completed (with glitter). I hope the camera was able to capture some of the sparkle!

Thank you for visiting my blog today. Thanks to the ladies who organized the blog hop. It was a six month blog and video hop aimed at using up supplies that we have "squirreled" away in our stash. Each month was a different theme. 

Next Up in the Hop:

(having technical issues, please check back later)

In the meantime, please check out Virginia:


Tuesday, December 22, 2020

Sending Hugs - Gerda Steiner Designs (Not 2 Shabby Design Team)

Hello! My project for the Not 2 Shabby Design Team features a cute card featuring the "Sending Hugs" stamp set by Gerda Steiner Designs.


I create a video for this card. You can watch here:

I created this card by:

1. Stamped the images with Memento Tuxedo Black Ink onto Accent Opaque 120 lbs. cover stock paper. Colored the images with Copic and Ohuhu alcohol ink markers. I then cut them out with a Brother Scan N Cut.

2. Used light blue cardstock as my panel. Used distress ink in Speckled Egg and covered the entire light blue panel in Speckled Egg ink with a blending brush.. Ink blended the edges with Peacock Feathers Distress ink. After the panel was dry, I sprayed it with Shimmer Bliss (Dazzle). This created sparkle. I think flicked snow onto the panel using white gouache paint (watered down).

3. I had a die in my stash set that I used. The die has two pine trees and another tall tree. I used Catherine Pooler ink in Green Tea, Eucalypts and Icing on the cake to ink blend the colors on the white die cut pieces.

4. I assembled the scene onto the Speckled Egg cardstock. I made a snow bank with a piece of white glitter cardstock. I layered the Imagines onto top of each other to fit into the scene.

Save 10% off your order at Not 2 Shabby by using my affiliate link. https://www.not2shabbyshop.com/Sending-Hugs-4x6-Clear-Stamp-Set_p_13905.html?AffId=25

Not 2 Shabby Shop: https://www.not2shabbyshop.com/?AffId=25

Use Promo Code: “N2S10” for 10% off your order at Not 2 Shabby! Some exclusions apply. Check out my first video, where I made 2 adorable tabs with this set: My Social Media: YOU TUBE: https://www.youtube.com/c/TracyShultz INSTAGRAM: @Shultz551 BLOG: https://thehopefulcrafter.blogspot.com/ PINTEREST: https://www.pinterest.com/shultz551/ FACEBOOK: https://www.facebook.com/tracy.shultz EMAIL: thehopefulcrafter@gmail.com

Tuesday, December 15, 2020

It's a Wrap Digital Stamp ~ Createful Heart Design Team

Merry Christmas and Happy New Year. 
It's a Wrap Digital Stamp by Createful Heart Design


 You can find this digital image at the Createful Heart Design website: https://marketplace.zibbet.com/createful-heart-design/it-s-a-wrap-digital-stamp

To create this card, I printed the image with my ink jet printer. I colored the image with alcohol markers. I used a wonky stitched rectangle die to trim the image. I used pattern paper from my stash (Christmas Lights) and trimmed it with the next larger wonky stitched rectangle die. I then layered the It's a Wrap image on top of the pattern paper. I adhered these to a red cardstock panel. My card base is a 5x7 green cardstock. I heat embossed the sentiment "Wishing you a season of  Love and Joy).  My finishing touches were the holly and berry 3D sparkle stickers on each of the four corners. 

https://createful-heart-design.zibbet.com/shop

Our Blog Challenges run from the 15th of the month through the 13th of the following month. The Blog Challenge website is: http://createfulheartcards.blogspot.com/  The theme is always Anything Goes

Find me on Social Media:

YOU TUBE: https://www.youtube.com/c/TracyShultz

INSTAGRAM: @Shultz551

Thank for you visiting my blog. 

Wednesday, December 9, 2020

Little County Church - Blue Knight Rubber Stamps Design Team

Today I have three cards using the Blue Knight Rubber Stamps "Little Country Church" stamp set. This is a two piece set that comes with the scene and a separate stamp with the sentiment. 


 I created a video on my YouTube Channel with step by step instructions:
   

Card #2 Stamped with Vintage Photo Distress Ink and covered with glitter to create the effect of snow. 
Card #3 colored with alcohol markers. 

Card #1 was created by using the BKRS cloud stencil and Cornflower Blue dye ink by Ranger/Wendy Vecchi to make the cloud background. I then stamped the image with midnight archival ink by Catherine Pooler. I used Karin markers to water color and color in the image. I then placed the completed card panel on 6 inch clear double sided adhesive tape. I removed the backing and sprinkled glitter onto the card panel. I then burnished the panel (I used a piece of paper and covered the panel then rubbed it with my hand) to increase the likelihood that the glitter will remain on the card. I placed the panel onto a piece of craft cardstock and white A2 card base. I heat embossed the "Merry Christmas" sentiment from the Winter Cardinals stamp set with gold embossing powder and placed it on the card panel. 

Card #2 was created by stamping the image on ivory cardstock with vintage photo distress ink. I then placed the card panel on 6 inch clear double sided adhesive tape. I removed the backing and sprinkled glitter onto the card panel. I then burnished the panel (I used a piece of paper and covered the panel then rubbed it with my hand) to increase the likelihood that the glitter will remain on the card. I stamped and embossed the sentiment that came with the stamp set in black ink and black embossing powder.  I trimmed the sentiment and used Vintage Photo ink to ink the edges of the sentiment. I glued this panel onto a white A2 card base. 

Card #3 was created by coloring with alcohol markers in a variety of colors. I then colored the background with light blue alcohol ink. I used black ink to stamp the sentiment on the top right hand corner of the card panel. 

Thank you for visiting my blog today. You can find each of today's featured stamps HERE at the Blue Knight Rubber Stamps web store.  

And don't forget to join us at the Fan Group and on Facebook.

The Blue Knight Rubber Stamps YouTube Channel HERE has lots of great tips and tricks. 

   Thank you for stopping by my blog today. Have a hopeful day!

 Find me on Social Media:

 You Tube: https://www.youtube.com/c/TracyShultz

 Instagram: @Shultz551

 Blog: https://thehopefulcrafter.blogspot.com

 Pinterest: https://www.pinterest.com/shultz551

Email: thehopefulcrafter@gmail.com

Tuesday, December 8, 2020

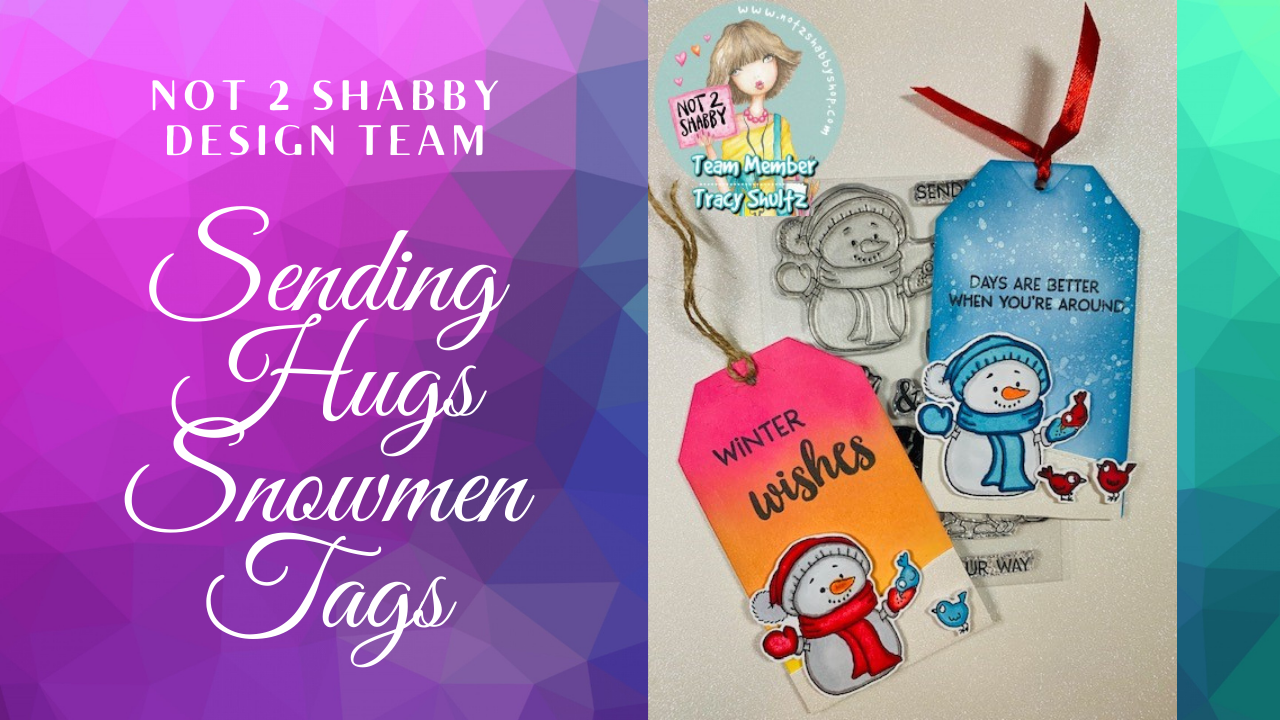
Cute Snowmen Tags - Sending Hugs by Gerda Steiner Designs - Not 2 Shabby Design Team Video

Hello and welcome!  My project for the Not 2 Shabby Design Team features two cute tags using the "Sending Hugs" stamp set by Gerda Steiner Designs. Save 10% off your order at Not 2 Shabby by using my affiliate link.  Not 2 Shabby Shop: https://www.not2shabbyshop.com/?AffId=25
Use Promo Code: “N2S10” for 10% off your order at Not 2 Shabby! Some exclusions apply. 


I created a YouTube video demonstrating step by step how I created these adorable tags. Thanks so much to everyone that watches - please leave a comment and give me a thumbs up!

 I used the Hero Arts Infinity dies to cut out my tags. I used the largest die tag from that set. My first tag features a distress oxide ink blended background that I splattered with clear shimmer spray to create the look of snow. I colored my snowman and his three little bird friends with Ohuhu alcohol markers. I cut a snowbank out of white sparkly glimmer paper and glued it to the distress oxide panel. I used foam tape to pop up the snowman and the birds. I then stamped the sentiment  "Days are always better when you're around" to the top of the tag. I slipped some red satin ribbon through the hole punch at the top of the tag.  Now, all it needs is the name of the intended recipient. I can write that in with a white gel pen. Who wouldn't love to see this cute die hanging from their Christmas gift? 

My second tag is very similar to the first, with a few differences. The colors I used to ink blend the background are Picked Raspberry, Squeezed Lemonade, and Spiced Marmalade. I also colored the snowman's outfit with a red scarf instead of a blue and instead of red birds I colored the birds blue. I used a piece of twine instead of silk ribbon and I used the sentiment "Winter Wishes."

https://www.not2shabbyshop.com/Sending-Hugs-4x6-Clear-Stamp-Set_p_13905.html?AffId=25

My Social Media:
  INSTAGRAM: @Shultz551


Monday, November 30, 2020

Christmas Gnomes - Same Set Syndrome

Hello. Thank you for visiting my blog today. For the past six months, I have been part of a hop group that each month uses the same stamp set to create a YouTube video or blog post. The hashtag to find these posts is: #SameSetSyndromeNovember

This is our last month, and our sponsor is Scrapping for Less (SFL).  There are lots of prizes so please be sure to comment on my blog as well as the other blogs and YouTube Videos. Make sure you connect to the next person in the hop, Theresa Russell, the owner of SFL: https://youtu.be/C0vzDgmCXLs

Who can resist cute little Gnomes? They are adorable and SFL created a set of ephemera and a pad of paper with Gnomes, winter sentiments, and nordic themed images. It was such fun to create cards with this set of papers and ephemera. 


The first card features one of the frames from the ephemera set mounted onto a mat made of red glimmer card stock. The frame has green trees in the lower right corner. I added several additional trees of varying sizes to the top of the card to create the tree line in the background. It is the same style of tree that is featured on the frame from the set. I used a white souffle gel pen that puffs up to create snow on the trees. I used small snowflake stamps from my stash to stamp snowflakes in the background. The Gnome was from the ephemera set. The finishing touch was the small lantern from the ephemera glued to the gnome's hand. 

The second card features two different papers from the paper pack. I also layered a piece of white shimmer paper and several elements from the ephemera pack. I used my gel pen to again add snow to the tree and I glued a candy cane to the gnome's hand. Don't you just love that sentiment? It says "I'll be Gnome for Christmas." The Gnome has a big present that he will be taking home with him. The card base is gray. All of the elements are adhered to the white glimmer paper with foam dots to give the card some depth. 


The third card features two pieces of patterned paper from the pack. I used a piece of red glimmer card stock across the middle and layered several pieces of the ephemera onto the front of the card, including the sentiment "Oh What Fun." I just had to use the adorable goat that came with this set. I also put a Gnome and a tree from the ephemera set on the card front.                                                                                                                                                                                             

The final card that I made features two pieces of pattern card stock from the set and one piece of blue shimmer paper. I put two trees from the ephemera pack and one of the sentiments on the front of the card panel. Even the sentiment has a little Gnome! I used pop dots to adhere the sentiment to the card panel. I then added red gems to the trees. The card base is gray.  

Thank you for visiting my blog. I enjoyed making these Holiday Cards for this hop. Next up in the hop is Theresa Russell at: https://youtu.be/C0vzDgmCXLs

MY SOCIAL MEDIA:

Tuesday, November 24, 2020

Christmas Snowflake Card - Crackle Texture Paste through Stencil with Glitter

Hello.  Thank you for visiting my blog today.  I am part of the Monthly Themed Hop Group. Each month we use up supplies that we have "squirreled away."  The theme this month is to make a Christmas Card and use Texture Pastes. I decided to use a Gina K Stencil, some crackle texture paste, and a Honeybee Stamps Sentiment.


Steps to create this card:
1. Sprayed the back of the Gina K Mandala Burst Stencil with Pixie Spray
2. Adhered the stencil to Accent Opaque 110 lbs. white card stock.
3. Using a plastic spatula, spread Crackle Paste through the stencil. 

4. Sprinkled Recollections Opaque Sparkle Vintage Blue Glitter Embossing Powder over the Texture Paste.


5. Allowed the stenciled glitter panel to dry overnight.
6. For the background panel, I used glimmer cardstock by Recollections (light blue)
7. I trimmed the stenciled glitter panel to 4 x 5 and layered in on top of the glimmer background panel
8. I used the Honeybee Stamps "Winter" Buzzcut Die. This die features three layers. The background is a stitched shadow. I used the blue glimmer cardstock by Recollections for that layer. For the middle layer I used silver foil cardstock. For the top sentiment layer I used white glimmer cardstock by Recollections. 
9. I adhered the sentiment to the front of the glitter panel with foam dots.
10. I found a sentiment in my stash that says "warm hugs." I stamped it on light blue cardstock with Versafine Clair Warm Breeze Ink. I heat embossed the sentiment with WOW Clear Hologram Sparkle embossing powder. I used a corner chomper to round the corners of the mini sentiment. I used foam dots to adhere this to the panel below the main sentiment. 


Thank you for visiting my blog today. I hope you enjoyed my card. Next up in the hop is a YouTube Video by the fabulous Sharon Luska: https://youtu.be/RLwUjflnfy4

Monday, November 23, 2020

Cute Winter Bunny Card - Not 2 Shabby Design Team

 I created this cute winter bunny card for the Not 2 Shabby Design Team, using non-traditional holiday colors. Pink isn't a traditional holiday color, but I think it looks so pretty on this card. 

I created a video on my YouTube Channel with step-by-step directions:


Here's how I created my card:
1. Using a 6x6 paper pad (purchased last year from Michael's) I selected one sheet of pink (with snow) and one sheet that looks like white fur.
2. I stamped the bunny on the white fur patterned paper. I used my Brother Scan N Cut to cut out the bunny. I also stamped the trees on 100 lbs. cardstock using Versafine Clair inks: Rain Forest and Pine Cone. I used my Scan N Cut to cut out the trees. 
3. I colored the bunny with pink Ohuhu alcohol markers.
4. I stamped the sentiment with Charming Pink Versafine Clair ink. I heat embossed over that with Wow Clear Hologram Sparkle embossing powder. I trimmed a piece of Tim Holtz pink foil cardstock to serve as a background mat for the sentiment. 
5. I used a die to cut a piece of white glitter card stock in the shape of a snow bank.
6. I used the Sizzix Fallen Stars 3D embossing folder to emboss a piece of pink foil cardstock by Tim Holtz. I used this as my background panel.
7. I colored the tiny teacup that came with the stamp set with pink Ohuhu alcohol markers. 
8. I assembled the card by gluing the pink pattered paper to the pink 3D embossed cardstock. I then glued the snow bank, the trees and the bunny to the card panel. 
9. I added a few sequins to the bottom right corner of the card. 
10. I adhered the finished card to a piece of white 110 lbs. A2 cardstock. 

________________________________________________________________


To purchase these stamps sets visit Not2Shabby:
Use Promo Code: “N2S10” for 10% off your order at Not 2 Shabby! Some exclusions apply.

Products Used:
VersaFine Clair - Ink Pad - Charming Pink: https://www.scrapbook.com/store/par-tsuvf-cla-801.html
We R Memory Keepers - Crop-A-Dile - Corner Chomper Tool: https://www.scrapbook.com/store/wr-70904-6.html
Holiday Glitz Glitter Cardstock Paper Pad by Recollections™, 12" x 12": https://www.michaels.com/holiday-glitz-glitter-cardstock-paper-pad-by-recollections-12x12/10642718.html
Social Media:
https://www.youtube.com/channel/UCXiqXIFPPsdH9cwJ0AClXMA
INSTAGRAM: @Shultz551
BLOG: https://thehopefulcrafter.blogspot.com/
EMAIL: thehopefulcrafter@gmail.com

Wednesday, November 18, 2020

Cowboy Up - Blue Knight Rubber Stamps Design Team cards

 Hello and welcome to my blog. I am sharing two cards I made for the Blue Knight Rubber Stamps Design Team using the Cowboy Up stamp. 

I created a short video on my YouTube channel demonstrating how I made this card:


My second card features a PanPastels background and sunset:


The Cowboy Up Stamp Set comes with three stamps. The large and small cowboy on the horse and the sentiment. 


I created the first card by following these steps:
1. Using Pixie Spray, I placed a stencil with a diamond pattern onto a piece of Bristol Smooth card stock. I used PanPastels to shade the stencil. I used the Boot Stencil (available at Blue Knight Rubber Stamps) Mask to mark where I was placing my boot. After shading with Turquoise and green PanPastels, I removed the stencil.
2. I used the boot stencil (no Pixie Spray) to fill in the boot area with Raw Umber and Burnt Sienna Tint Pan Pastels. 
3. I used a stamp positioning tool to stamp the Cowboy silhouette image. I used Catherine Pooler midnight ink to stamp the Cowboy and the sentiment. 
4. I used hair spray to seal the PanPastels. 
5. I layered a piece of black cardstock behind the card panel then adhered both to a white A2 Card base.

Here's how I created the second card:
1. Using masking paper, I die cut a large circle to be used as the sun in the background behind the Cowboy. I placed the circle mask on my Bristol Smooth Card Base.  
2. Using the Blue Knight Rubber Stamps Reverse Cloud Stencil, I created my background with orange and yellow PanPastels.  I used the colorless blender to blend the orange and yellow PanPastels. 
3. I removed the circle mask. I colored the sun with yellow PanPastels.
4. Using a stamp positioning tool, I stamped the Cowboy stamp directly over the sun. I used Catherine Pooler Midnight Archival Ink to stamp the Cowboy image and the sentiment onto the card panel. 
5. I sprayed the panel with hairspray to set and PanPastels and prevent smudging. 
6. I used a piece of Kraft cardstock as a mat to layer the panel and adhered it to a white A2 card base. 

Thank you for visiting my blog today. You can find each of today's featured stamps HERE at the Blue Knight Rubber Stamps web store.  

And don't forget to join us at the Fan Group and on Facebook.

The Blue Knight Rubber Stamps YouTube Channel HERE has lots of great tips and tricks. 

   Thank you for stopping by my blog today. Have a hopeful day!

 Find me on Social Media:

 You Tube: https://www.youtube.com/c/TracyShultz

 Instagram: @Shultz551

 Blog: https://thehopefulcrafter.blogspot.com

 Pinterest: https://www.pinterest.com/shultz551

Email: thehopefulcrafter@gmail.com


Sunday, November 15, 2020

Gingerbread Joy - Createful Heart Design Team

 Hello! Welcome to my Blog. Today I am sharing a layered card featuring the super cute "Gingerbread Joy" Digital Stamp for the Createful Heart Design: 


You can find this digital stamp here: https://marketplace.zibbet.com/createful-heart-design/gingerbread-joy-digital-image?fbclid=IwAR225hUqmQCJb_S7y90A8_o6acNgi14CJard5_xz6Vw0e31nU961zqf9k7M

I created this card by first printing the image on 100 lbs. card stock. I increased the size of the sentiment and decreased the size of the gingerbread man. I printed these and colored the sentiment and two of the Gingerbread men with Ohuhu alcohol ink markers.  I used my ScanNCut to die cut the sentiment and the two Gingerbread men. I used Nuvo Drops to paint "icing" and "buttons" on the Gingerbread men. I used puffy medium for the pom poms on hats. 


I used the Stitched Indented Rectangles from Elizabeth Craft Designs to die cut two pieces of pattered paper.  The bottom layer of patterned paper is green with white polka dots.  The top layer of pattern paper features holiday goodies such as Christmas Cookies, Gum Drops, Gingerbread Men and Candy Canes.  I thought this pattern paper was a good choice because this month the design team members each provided Mary with a favorite recipe. 


I popped the Gingerbread Men up and placed them on the pattern paper. I used a piece of the Polka Dotted paper as a banner for the sentiment JOY.  I placed pop dots under the the letters of the sentiment and adhered them to banner.  I used a dark brown card base. I used a corner Chomper to round the corners of the dark brown card stock.


The owners of Createful Heart Design, Mary, and her husband Mark draw all the digital stamps by hand and Mary designs the digital papers on her computer. It is exciting to be a part of this design team and I hope that you will check out their online store. Here is a link to the online shop:


https://createful-heart-design.zibbet.com/shop

Our Blog Challenges run from the 15th of the month through the 13th of the following month. The Blog Challenge website is: http://createfulheartcards.blogspot.com/  The theme is always Anything Goes

Find me on Social Media:

YOU TUBE: https://www.youtube.com/c/TracyShultz

INSTAGRAM: @Shultz551

BLOG: https://thehopefulcrafter.blogspot.com/


Tuesday, November 3, 2020

Spotlight Technique - Blue Knight Rubber Stamps Away in Manager

Come, let us Celebrate the birth of Christ. This sentiment is from the "O Come Let Us Adore Him" stamp set from Blue Knight Rubber Stamp. I created this card for the Blue Knight Rubber Stamps Design Team using Arteza colored pencils and gamsol. I used Accent Opaque 100 lbs. card stock and layered a piece of silver foiled card stock under my colored panel. I adhered the foil panel and the colored panel onto a white A2 card base.  I used silver embossing powder for the sentiment and die cut that with a circle die. The spot light is the area without shading or coloring, where the light from the star shines bright on Baby Jesus in the manger. 

I made a video for my second card:


The second card is made with archival ink (ground expresso) on off white card stock (linen color).  Then, using a sponge, I applied Vintage Photo distress ink on the corners and edges. I kept the center clear, again with the light shining down on Baby Jesus in the manger. I used Versamark clear embossing ink and clear embossing powder and heat embossed the entire panel. I was hoping the card would look like a sepia (old fashioned) photo. I matted it down on Kraft colored card stock and then onto a white A2 size Card Base. 

You can find each of today's featured stamps HERE at the Blue Knight Rub
ber Stamps web store.  

And don't forget to join us at the Fan Group and on Facebook.

The Blue Knight Rubber Stamps YouTube Channel HERE has lots of great tips and tricks. 

   Thank you for stopping by my blog today. Have a hopeful day!

 Find me on Social Media:

 You Tube: https://www.youtube.com/c/TracyShultz

 Instagram: @Shultz551

 Blog: https://thehopefulcrafter.blogspot.com

 Pinterest: https://www.pinterest.com/shultz551

Email: thehopefulcrafter@gmail.com


Spellbinders Guest Creator

Blue Knight Silhouette Grasses, Pan Pastels & Ink Blending.